How to Bypass Windows 11 System Requirements

If you’re upgrading to Windows 11 you may find that your PC doesn’t meet the requirements. Learn how to bypass the Windows 11 system requirements.
Are you having trouble upgrading your computer to Windows 11? Unfortunately, the latest version of Microsoft’s hugely popular OS comes with system requirements that don’t apply to Windows 10. You may find that when you try to upgrade your Windows 10 computer to Windows 11, you’re told that your hardware isn’t capable of running the newer version of Windows.
Although this is frustrating, it’s not the end of the world. There are ways to install Windows 11 on unsupported hardware, even if your PC doesn’t meet the requirements. In fact, Microsoft even explains one method of doing so on its own website. If you want to upgrade despite not having the necessary hardware, then here’s how to bypass Windows 11 system requirements.
What are the Windows 11 System Requirements?
Microsoft states that in order to install or upgrade to Windows 11, your computer must meet the following requirements.
- Processor: 1 GHz or faster, two or more cores on a compatible 64-bit processor or SoC
- Memory: At least 4GB
- Storage: At least 64GB
- Graphics: Compatible with DirectX 12 or later, with WDDM 2.0 driver
- Display: 720p HD or higher, minimum 9-inch monitor, 8 bits per color channel
- Firmware: Support for UEFI, Secure Boot
- Trusted Platform Module: TPM 2.0
- Internet: Must have internet connectivity. A Microsoft account is required for Windows 11 Pro and Windows 11 Home.
How to Determine Why Your Computer Doesn’t Meet the System Requirements
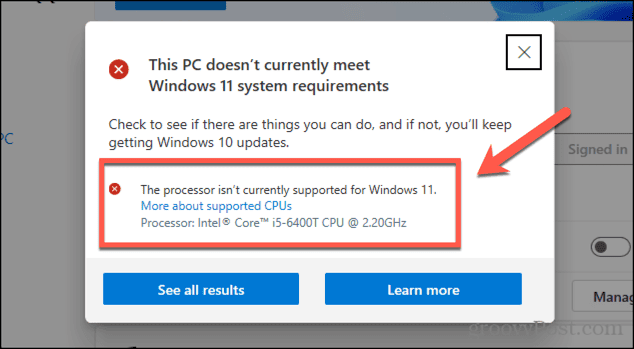
If you’re seeing a message that your PC cannot upgrade to Windows 11, it may not be immediately obvious what the reason is. Checking things such as the amount of RAM and storage space on your computer is simple enough, but you may have no idea about the specs of your processor or whether your firmware supports Secure Boot. Thankfully, Microsoft has a free app that you can use to check whether your computer can run Windows 11, and if it can’t, you’ll see details of which of the requirements it fails to meet.
- Type PC Health Check in the search field in the taskbar.


- Open the PC Health Check app from the results.


- If the app isn’t installed on your PC, you can download and install it.
- Once PC Health Check has launched, click the Check Now button.


- The app will determine if your PC meets the system requirements to upgrade to Windows 11. If it doesn’t, you’ll see information on which requirements your hardware fails to meet.

How to Bypass the TPM or CPU Requirements
If the PC Health Check app informs you that your processor is not on the approved list, or that you don’t have the TPM 2.0 security chip, it’s still possible to upgrade to Windows 11. Bizarrely, Microsoft explains how to do so on its own website. However, it does strongly recommend against installing Windows 11 if you don’t meet the system requirements. We’ll discuss later in the article why you may choose not to do so.
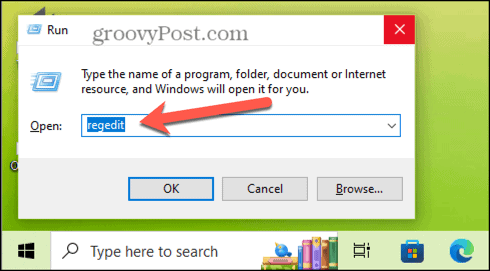
- Press Win+R to open a Run window.
- Type regedit and press Enter.

- In the left-hand menu, navigate to HKEY_LOCAL_MACHINE > SYSTEM > Setup > MoSetup.


- Right-click anywhere in the empty space in the main window and select New > DWORD (32-bit) Value.


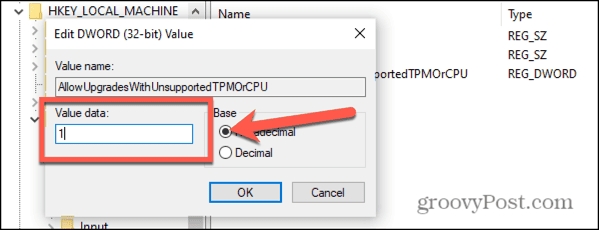
- Enter the Value Name as AllowUpgradesWithUnsupportedTPMOrCPU. Make sure you enter this carefully as it won’t work unless this entry is correct.


- Double-click the new entry and set the Value Data to 1.

- Click OK.
- Restart your computer.
- You should now be able to install Windows 11 despite not meeting the system requirements.
How to Use Rufus to Bypass Windows 11 System Requirements
You can use a free application called Rufus to create a bootable USB that allows you to perform a clean install of Windows 11 that can bypass the RAM, Secure Boot, and TPM requirements as well as remove the requirement for an online Microsoft account. You’ll need a USB drive to boot from and a copy of the Windows 11 Disk Image (ISO), which you can download as explained below.
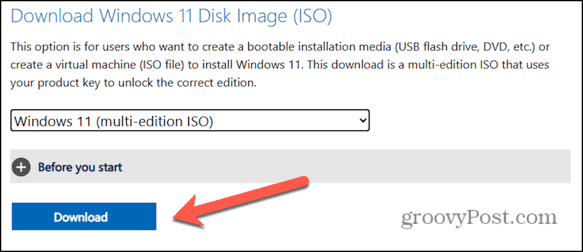
- Visit the Microsoft Windows 11 download page.
- Download the Windows 11 Disk Image (ISO) for x64 devices.

- Click the Microsoft Store icon in the taskbar.


- In the search field, type Rufus.


- Select the Rufus app from the results.

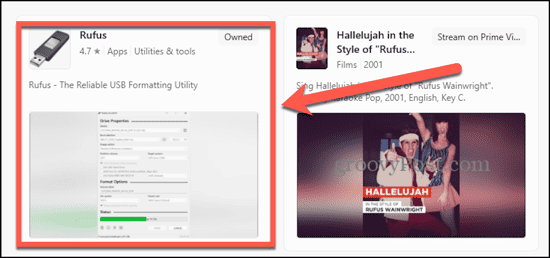
- Click Install.
- Once Rufus is installed, launch the app.
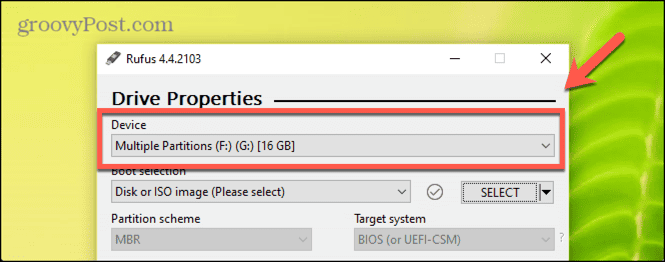
- Connect your USB drive to your computer and select your USB drive under Device.

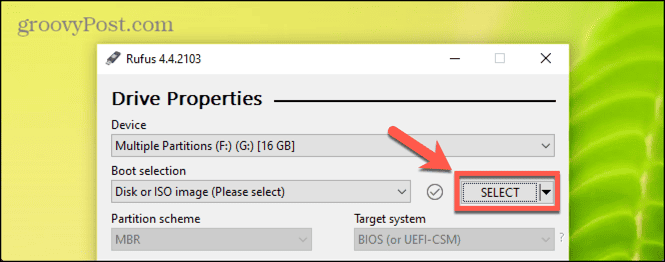
- Under Boot Selection ensure that Disk or ISO image is selected and click the SELECT button.

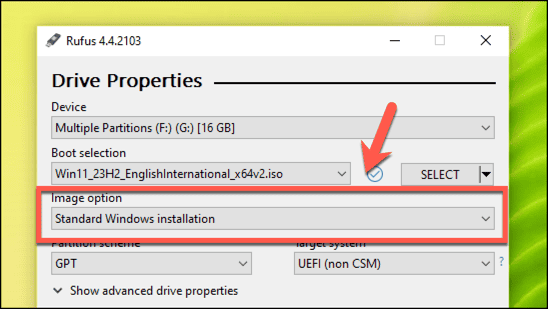
- Navigate to the Windows 11 Disk Image (ISO) that you downloaded in step 2.
- Select Standard Windows Installation.

- Click Start.


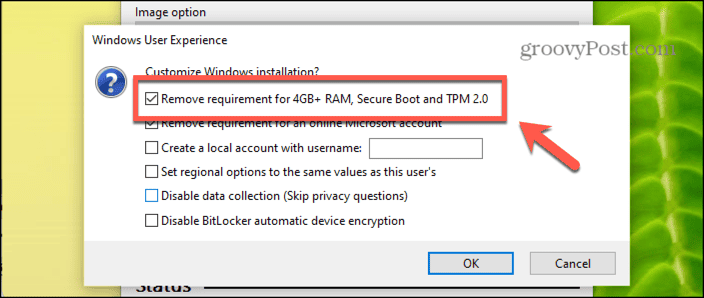
- In the Windows User Experience window, check Remove Requirement for 4GB+ RAM, Secure Boot and TPM 2.0.

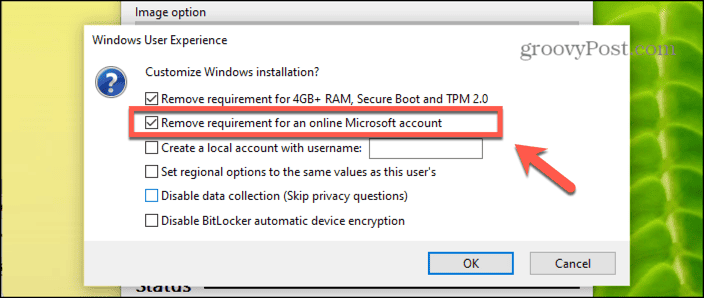
- If it is showing, check Remove Requirement For An Online Microsoft Account.

- Click OK.
- Once the process is complete, click the Start button.
- Click the Power icon.
- Hold down the Shift key and click Restart.
- In the restart options, select Use a Device and select your USB drive.
- Your computer should boot from the USB drive, and the Windows 11 installation should start.
Should You Run Windows 11 Without Meeting the System Requirements?
Knowing how to bypass Windows 11 system requirements doesn’t necessarily mean that it’s something you should do; you need to be aware of the risks. Microsoft states that installing Windows 11 on unsupported devices is “not recommended” and that your device may malfunction due to compatibility issues. You will also no longer be entitled to receive updates, including security updates, which means your computer may be at higher risk. Any damage to your PC due to lack of compatibility will not be covered by your manufacturer’s warranty.
However, it’s also the case that many people are running Windows 11 on unsupported hardware without any noticeable issues. For example, Microsoft states that the CPU must have at least two cores, run at 1GHz or faster, and be on the approved list of CPUs. However, there are many processors that meet the core and clock speed requirements that don’t appear on the approved list. As long as your CPU meets those requirements, you should be able to run Windows 11 without too many issues, even if the CPU is not on the supported list.
Ultimately, running Windows 11 on unsupported hardware comes with risks. It’s your decision as to whether you’re willing to take those risks or not.
9 Comments
Leave a Reply
Leave a Reply


Petyo123
March 16, 2024 at 2:32 pm
Nice article, but now comes a new test – how to bypass POPCNT ?
Diego
March 16, 2024 at 9:50 pm
Hi Adam. Sorry for this off topic message, but can you tell me what software you used to edit the screenshots?
Jeff Butts
March 18, 2024 at 2:12 am
Hi Diego,
I’m not Adam, obviously, but almost all of us here at groovyPost, Adam included, use Snagit to capture and edit screenshots.
Thanks for reading,
Jeff Butts
groovyPost
Diego
March 18, 2024 at 7:38 am
Hi Jeff. Thanks for responding to another author’s article. Yes, in several articles I have seen screenshots with nice edits and I was wondering what software they were using. Now I know they use Snagit, great product by the way.
Thank you very much, I needed something like this, I’m already using it.
That’s all, good day! :)
Richard Paul
March 17, 2024 at 6:00 am
My CPU 7th Gen. Runs just fine on Win 11.No problemos at all.
Ruedi Wigger
March 17, 2024 at 6:46 am
I can’t get the UEFI up great from Intel. My CPU has the windows 11 requirements.
Steve
March 18, 2024 at 9:52 am
I changed the registry, downloaed the Win11 iso from microsoft – followeed the instructions. Changed the boot order to run from USB and several hours I have given up. I guess my PC isn’t meant for the upgrade ;-(
Steve Krause
March 18, 2024 at 10:47 am
Hi Steve – where did it stop? Were you able to boot from the USB and being the upgrade?
Anderson Ekuvero
May 18, 2024 at 6:16 am
Did everything from the first method to bypass but still when I launch the windows 11 update , it still gives me the same requirement thing