How to Undo a Save in Excel

Have you made some unwanted changes to your Excel spreadsheet and then saved it? All is not lost. Here’s how to undo a save in Excel.
Do you ever wish you could go back in time? Maybe you’d like to see the dinosaurs or meet Isaac Newton. Or perhaps you just want to go back and stop yourself from saving your Excel file after you accidentally deleted a ton of important data.
Well, time travel may not be possible, but fixing mistakes that you’ve made in your spreadsheet is. It’s possible to undo your mistakes or even revert to an earlier version of your document. Here’s how to undo a save in Excel.
How to Undo a Save in Excel if the File is Still Open
When you’re working on an Excel file, you might regularly save your file while you’re working on it. You probably do this if you’ve been burned in the past by your computer crashing, running out of battery, or being hit by a power cut, causing you to lose all your hard work. Regular saving is a very useful habit to get into. However, what if you save your Excel spreadsheet only to realize that you’ve made changes you don’t actually want? The good news is that as long as you haven’t closed the file yet, you can roll back those changes.
- To undo your previous change in Excel, click the Undo button at the top of the screen. You can also use the keyboard shortcut Ctrl+Z on Windows or Cmd+Z on Mac.

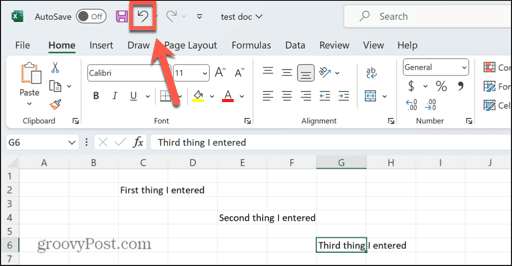
- The last thing you change will be undone, even if you saved the document after making the change.

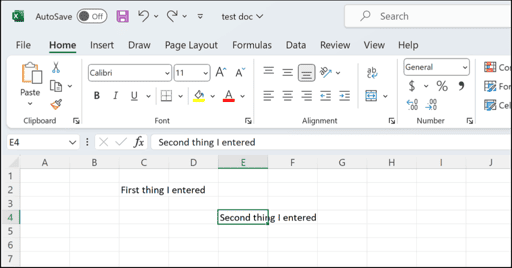
- To undo another step, press the Undo button again.
- To undo further steps, keep pressing the Undo button.
- If you go too far, press the Redo button to restore the change you’ve just undone.
- Once you’ve undone the changes you want to remove, you can save your file as the current version.
- This method will only work while the spreadsheet is still open. If you save and close your file, you won’t be able to undo any previous changes when you open it again.
How to Undo a Save in Excel Using Version History on Windows
If you save an Excel file locally and close it, that file is saved as the only version of the file. There is no version history saved, so any changes that you’ve saved are permanent once you close the file. However, if you’re using the AutoSave feature in Excel that automatically saves the document you’re working on to OneDrive, then it is possible to access previous versions of your Excel spreadsheet. This means you can roll back any unwanted changes as far back as the time that you turned the AutoSave feature on.
- In any Excel file that has the AutoSave feature turned on, click the File Name at the top of the spreadsheet.


- Select Version History.

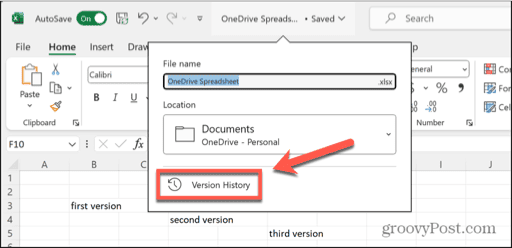
- You can also access your version history by clicking the File menu.


- Select Info.


- Click the Version History button.

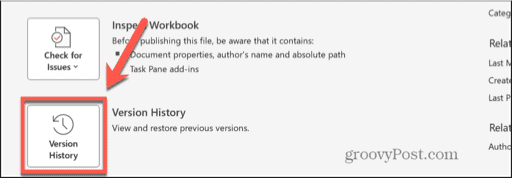
- A new window will open with a Version History panel on the right-hand side.

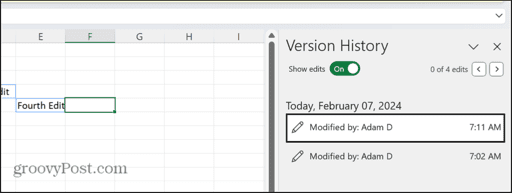
- Select one of the saved versions of your spreadsheet.
- The spreadsheet will display the saved version in the main window.
- When you’ve found the version you want, save it by clicking the File menu.


- Select Save As.


- Give your file a name and location and click Save.


- The file is saved, with the current version of your spreadsheet still unchanged.
How to Undo a Save in Excel Using Version History on Mac
If you’re using Excel on a Mac, the process is slightly different, but the concept is the same. As long as you have been using the AutoSave feature to automatically save your changes to Microsoft OneDrive, you will be able to view previous versions of your spreadsheet, even if you’ve closed the file and opened it again. You can then choose to save any of these earlier versions if you wish.
- In an Excel file that is using the AutoSave feature, click the File Name at the top of the screen.


- Click Browse Version History.


- You can also access the version history by clicking the File menu in the menu bar and selecting Browse Version History.

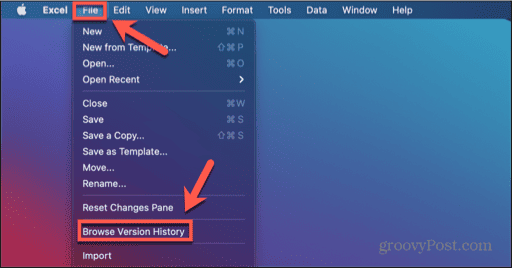
- A Version History pane will open on the right-hand side of the screen. Unlike on Windows, this will not open in a new window.
- To view a previous version of your file, click Open Version.

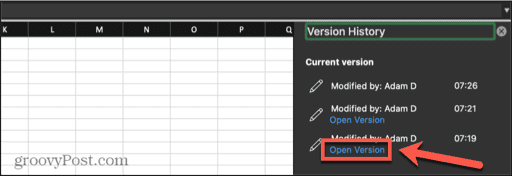
- A new window will open showing the saved version of the file.
- If this is the version you want, click the File menu in the menu bar, and select Save a Copy.

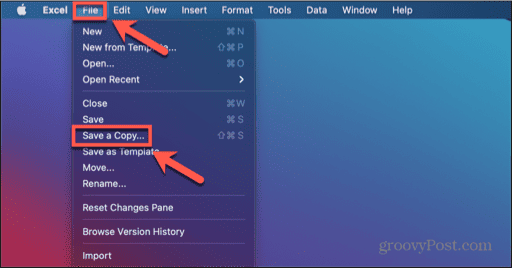
- If this isn’t the correct version, close the window, and open a different version from the Version History pane until you find the right version, which you can then save.
- The current version of the file will remain untouched, and you can continue to edit it as much as you like.
How to Turn on AutoSave in Excel
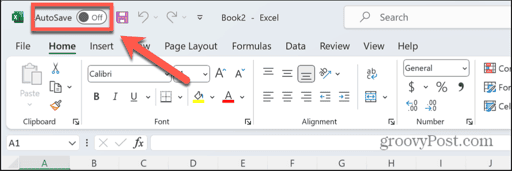
To be able to use Excel version history, you’ll need to use the AutoSave feature. This feature automatically saves your spreadsheet as you’re working, and stores backups of earlier versions of the file so that you can row back changes if needed. If you don’t have AutoSave turned on, it’s not possible to see previous versions of your Excel spreadsheet. It’s a good idea to turn this feature on when you’re working, as it will ensure you have an up-to-date copy of your spreadsheet saved even if something goes wrong. You’ll need a Microsoft OneDrive account to use this feature; you can get up to 5GB of storage for free, or more storage space if you sign up for a paid account. Once you have a OneDrive account, you can turn on AutoSave in just a couple of clicks.
- At the top of your screen, toggle AutoSave on.

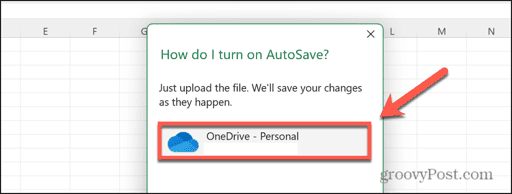
- Select the OneDrive account you want to save to.

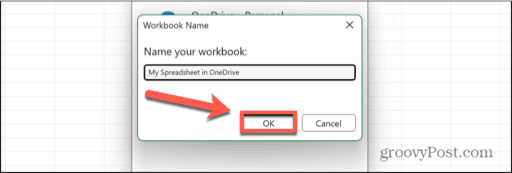
- Give your file a new name or keep the current name if you wish.
- Click OK and your spreadsheet is uploaded to the cloud.

- Now as you work, your spreadsheet will automatically save as you make changes. This may not happen after every change you make, however.
- At the top of the screen next to the File Name you’ll see the status of the file, which should show as Saved providing you have a network connection.


- If you don’t make any changes for a while, you’ll see information about when the last AutoSave occurred.


How to Save a Copy of an Excel Spreadsheet in OneDrive on Windows
Working with a spreadsheet that’s saved to OneDrive is useful as it allows you to keep revision history should you need to make changes. However, at some point, you may need an offline copy of the file. This could be if you want to work without an internet connection, you want to email the file to someone else, or if OneDrive isn’t syncing for some reason. If this is the case, you can save a copy of your file, which will still leave the original safely stored in your OneDrive account.
- On Windows, click the File menu.


- Select Save a Copy.


- Select This PC or Browse to choose an offline location that isn’t your OneDrive account.

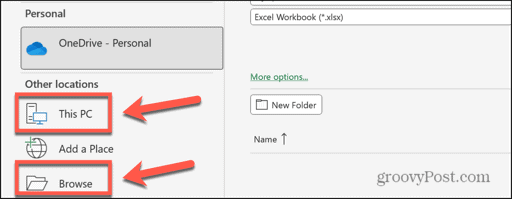
- Choose a location for the file and rename it if you wish, then click Save.


- The current document will change to display the offline copy and your file will stop changing automatically.
- If you want to return to the original OneDrive document, click the File menu.


- Select Open.


- Under Personal select your OneDrive account.

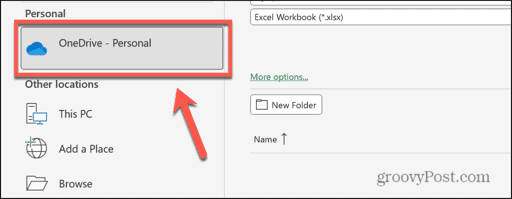
- Locate the file and open it from your OneDrive.
How to Save a Copy of an Excel Spreadsheet in OneDrive on Mac
If you’re using Excel for Mac, the steps are slightly different.
- Click the File menu in the menu bar and select Save a Copy.


- To save the copy offline, click the On My Mac button and select a location on your computer.

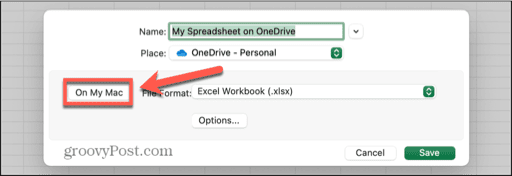
- Rename the copy if you wish and click Save.

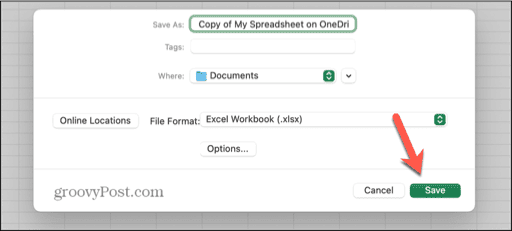
- The current spreadsheet will change to the offline version, which won’t save automatically.
- You can open the original OneDrive version at any time by clicking File > Open.


- Click the Online Locations button.

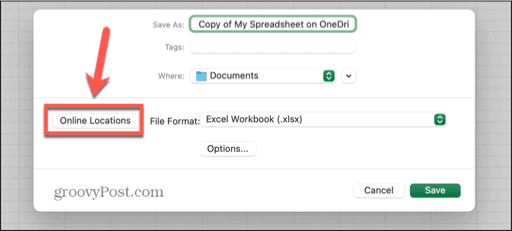
- Locate the file and open it from your OneDrive.
Undoing a Save in Excel
You can undo a save in Excel at any time as long as you haven’t yet closed the file by using the Undo function in Excel. This will undo changes, including those that you made before you saved. Once you close the file, however, you can no longer undo those changes when you open it again.
That’s where using the AutoSave feature can help. Not only does this save your document automatically, but also allows you to see your revision history and revert to an older version of your spreadsheet even if you’ve saved other versions since.


