Steam Not Recognizing External Drive: 6 Fixes

Having trouble with Steam not recognizing your external drive? You can fix the problem by using the steps in this guide.
I’ve been building up my Steam library for over 15 years—that’s a lot of Steam sales I’ve participated in. The problem with buying games on Steam is finding the space for them. I use an external hard drive to install many of my Steam games, but I’ve encountered a problem with Steam not recognizing my external hard drive from time to time.
Thankfully, some of the fixes I’ve compiled below will help you fix the problem if your own external drive has issues.
Restart Your PC
If Steam isn’t recognizing your external hard drive, restarting your computer is often a quick and easy fix. It’ll refresh your system memory, giving your PC a clean slate to start working again—in theory.
You can quickly restart your PC by right-clicking the Start menu and selecting Shut down or sign out > Restart. Once your PC reboots, start Steam again and see if your external drive (and any games installed on it) are detected.


Disconnect and Reconnect Your External Hard Drive
If your Steam games appear uninstalled, reconnecting the external hard drive can help. Make sure to safely eject it first by right-clicking the USB icon by your clock and selecting Eject for your drive.


Once you’ve ejected the device, remove it manually from your PC, then plug it back in again. This should force Windows to reinitialize the drive and, hopefully, cause Steam to detect it. If it doesn’t, exit Steam and try disconnecting and reconnecting your drive again.
Assign a Drive Letter Using Disk Management
If your external hard drive doesn’t show up in File Explorer, it might need a drive letter. Windows should automatically assign a drive letter to an external drive when it’s detected, but it isn’t guaranteed. You can manually assign a new drive letter to your drive using Disk Management. To assign a drive letter, follow these steps.
- Right-click the Start menu and click Disk Management from the options.


- In the Disk Management window, right-click on your external drive in the list and select Change Drive Letter and Paths.


- Click Add if it has no letter or Change to assign a new one.


- Choose a new drive letter and click OK to apply it.


Check for Drive Errors Using Chkdsk
The Chkdsk tool has been available from the earliest days of DOS in the 1980s. It’s a useful tool to help you check for errors on your hard drive and fix them for you. If there’s a hard drive error on your external drive, it could stop Steam from recognizing it. Here’s how to check for drive errors.
- Right-click the Start menu and select Terminal (Admin). You can also choose to launch PowerShell or the older command prompt via the Start menu instead.


- In the terminal window, type chkdsk X: /f, replacing X: with the correct drive letter for your external drive.
- Press Enter to begin the checking process. Wait for the process to complete and follow any on-screen instructions to complete the process, if required to do so.


Repair Your Library Folder in Steam
Library folders are where Steam stores game files for games installed on your system. You can have multiple library folders, including ones for the games on your external drive.
If you’re seeing errors on your external drive when you’re trying to launch or install Steam games, you might want to use the built-in tool to help repair your library folder. This will correct any issues with corrupt files (assuming there isn’t a deeper issue at fault).
- First, open Steam and select Steam > Settings from the main menu at the top.

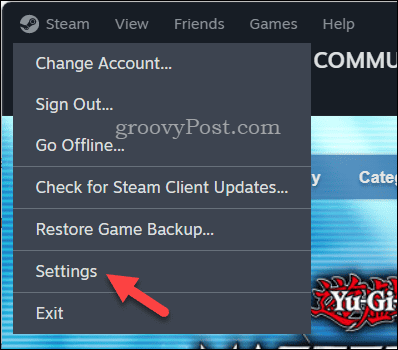
- In the Settings menu, click Storage.

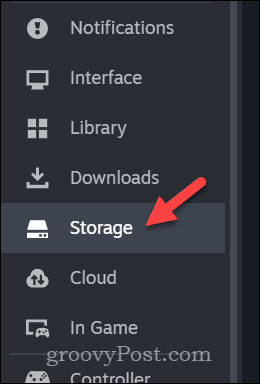
- Choose the library folder on your external drive from the drop-down menu.
- Click the three-dots menu icon next to the storage usage bar and select Repair Library from the menu.


Allow Steam some time to repair the folder—this may take a while to complete. Once completed, check that your drive is detected properly and you can launch any installed games from that drive.
Reformat Your External Hard Drive
Formatting your hard drive is a last resort, as doing so will wipe any of your data from it. However, reformatting your drive is a good way to reset it.
You’ll also need to do this if your hard drive is in a format that your Windows PC can’t recognize (such as a Linux-file format like ext4). If there’s an error during the formatting process, it could point to a hardware issue that may require you to replace the drive entirely.
Before you reformat, back up any valuable files first—you won’t be able to reverse the process once you begin. To ensure your external drive is formatted correctly, follow these steps.
- Make sure your drive is connected to your PC and you’ve backed up any files that you want to keep from it before you begin.
- Next, right-click the Start menu and select Disk Management. You can also format your drive in File Explorer, if you’d prefer.


- Right-click on the main partition from the drive you want to erase in the Disk Management window, then select Format.


- For File System, choose NTFS if you’re using a Windows PC. If you want to ensure compatibility between Mac and Windows PCs, select exFAT instead.
- Click the Perform a quick format option if you want the process to happen quickly. However, I’d recommend leaving this unchecked, just so you can ensure your drive is completely erased.
- Click OK and wait for the reformatting process to complete.


After the format, try adding the drive to Steam again by installing a game to it in a new library folder.
Fixing Steam External Hard Drive Problems
Thanks to the steps above, I’ve rarely encountered an issue with Steam not recognizing my external drive that I was unable to fix. Most of the time, a quick restart or reconnection will fix the problem.
If there’s a hardware issue, however, try a Chkdsk repair. You may also need to check your hard drive’s SMART data to see if your drive needs replacing.
Leave a Reply
Leave a Reply

