How to Wrap Text in Google Sheets

Text wrapping in Google Sheets allows you to handle how your cell data will appear once it reaches the cell wall. Here’s how to use it.
Cells in Google Sheets are a set size. If the contents of your cells are overflowing, your cell data is going to try and push beyond the cell border. Except—it won’t (unless the cell next to it is empty).
This isn’t the neatest way for your Google Sheets presentation to look. You could change the cell sizing, but this will have an impact on the other cells in your rows or columns. A good way to get around this is to wrap text in Google Sheets.
If you want to know how to wrap text in Google Sheets, follow the steps below.
What is Text Wrapping in Google Sheets?
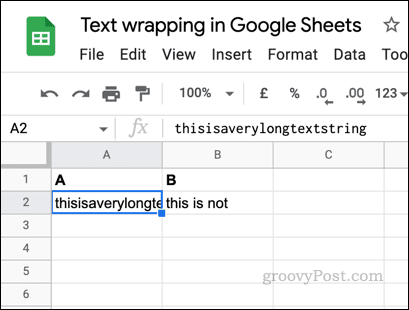
A Google Sheets spreadsheet is a grid of cells. To stop the data in each cell from appearing over the other, Google Sheets will hide any data that goes past the cell boundary. The data is still there—you just can’t see it.


An example of text in a cell being clipped (not wrapped) in Google Sheets.
Text wrapping is a feature in Google Sheets (and other tools) that changes this. If a number or text string in a cell is too big for the cell, the cell will resize, forcing the cell value onto a new line. It’ll continue to do this to ensure you can always view your data.
If you want to be able to always view your data without selecting your cell, text wrapping is a great way to do it. You don’t need to resize your cells to do it, ensuring consistency across your spreadsheet.
Text Wrapping Options in Google Sheets
Before you begin, however, you’ll need to know which type of wrapping you’ll want to apply. You’ll have three options to choose from (overflow, wrap, or clip).
Overflow will allow the contents of a cell to push over the cell boundary. Wrap will force the contents of your cell onto a new line (resizing the cell temporarily). Clip, meanwhile, will truncate your visible cell contents as soon as it reaches the cell boundary.
How to Wrap Text in Google Sheets on PC and Mac
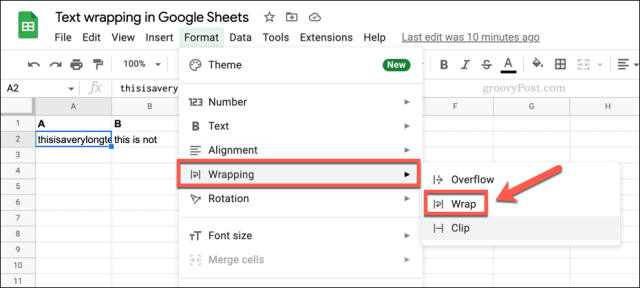
If you want to wrap text in Google Sheets from your web browser, you can do so by using the Format menu.
If you want to use text wrapping, you’ll need to select the wrap option. You can also apply one of the other options to allow text to be clipped or overflow your cell borders instead.
To wrap text in Google Sheets on a PC or Mac:
- Open your Google Sheets spreadsheet.
- Select the cell or cells you want to format.
- From the menu, press Format > Wrapping > Wrap to wrap your text.
- To cancel text wrapping, press Format > Wrapping > Clip or Overflow instead.


Running out of time? You can also quickly enable or disable text wrapping in Google Sheets by pressing the Text Wrapping icon on the taskbar and selecting one of the available options.
![]()
![]()
How to Wrap Text in Google Sheets on Mobile
You can also enable text wrapping in Google Sheets on a mobile device. If you’re using Google Sheets on Android, iPhone, or iPad, use the steps below to wrap your text.
To wrap text in Google Sheets on Android, iPhone, or iPad:
- Open the Google Sheets app and select your spreadsheet.
- Select the cell or cells you want to format.
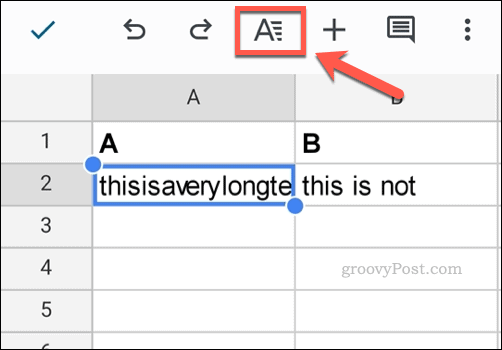
- Tap the Formatting button.


- From the pop-up menu, tap Cell.
- Tap the Wrap text slider.


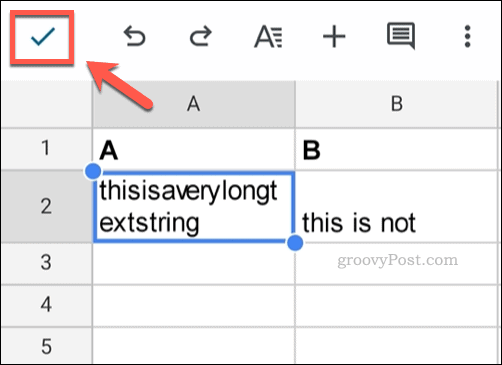
- To save your changes, tap the save icon in the top-left.


Formatting in Google Sheets
The steps above should help you to quickly wrap text in a Google Sheets spreadsheet. Google Sheets offers a number of other useful tools to help you format your spreadsheet.
For example, you may want to hide your gridlines to make your data easier to view. If you wanted, you could even insert an image into a Google Sheets cell.
Having trouble? You can always share your Google Sheets spreadsheet and work on it together.
Leave a Reply
Leave a Reply


