How to Track Changes in Microsoft Word Documents

If you collaborate with team members on projects, the Track Changes feature in Word 2016 is essential, and now more powerful. Here’s how it works.
If you collaborate with team members on projects or mark up contracts with redlines, tracking changes in Microsoft Word can be a lifesaver! Track Changes is a built-in feature in Microsoft Word which truly brings sanity to the process. Even if you are not working on complex projects such as acquisitions, mergers, contracts, or authoring a best seller – Track Changes can be just as useful for small group projects, such as school assignments.
Since we last covered this feature in Microsoft Word 2010, significant improvements make Track Changes even more powerful. With the availability of Office Online, users can perform real-time collaboration on a document, which is one of the exciting new features we look at in this article.
Enable and Use Track Changes in Word 2016
Step 1: Starting Content
You will need to start with some content within the document you are collaborating on. A different user is writing this part of the document. I wrote the first paragraph.


Step 2: Enable Track Changes
To start tracking changes, go to the Review tab and click Track Changes in the Tracking group (you can also press CTRL + SHIFT + E.)


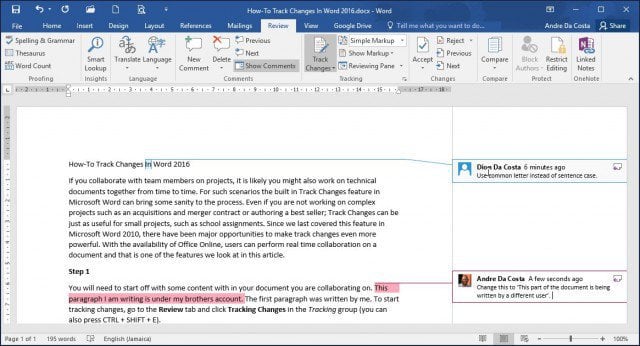
When Track Changes is enabled, you will see a balloon for each author on the screen’s right-hand side.

Step 3: Editing
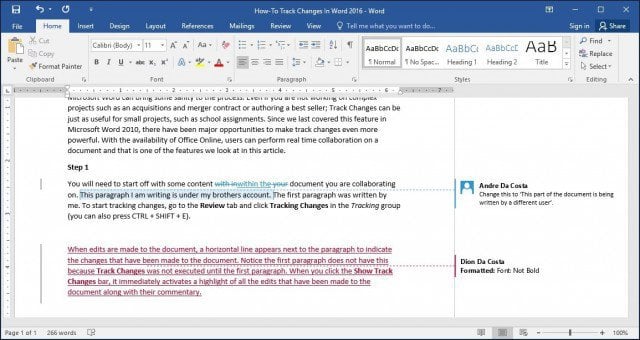
Track Changes in Word uses color coordination to avoid confusion. The first author is blue, and the second is red. When additional authors make edits, they will also be assigned a unique color.


When edits are made to the document, a vertical line appears next to the paragraph to indicate the changes that have been made to the document. Notice the first paragraph does not have this because Track Changes was not enabled until further into the document. When you click the Show Track Changes bar, it immediately activates a highlight of all the edits made to the document and their commentary. If you keep it enabled and make edits, you will see the changes in real-time as you type and delete.

Step 4: Comments, Balloons & Additional Editing Tools
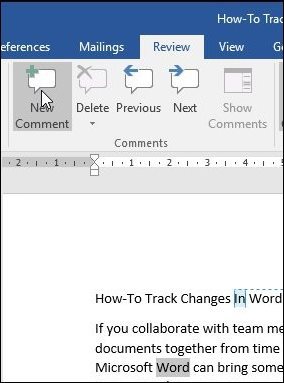
If you want to add a comment on a word or paragraph, highlight it, select the Review tab and click New Comment in the Comments group. Your comments will then appear on the right side of the document when the document is finalized; you can turn them off.

One of the things you’ll notice when you apply special formattings such as Bold, Italic, or Underline, a comment is automatically added to the track changes called Formatted.


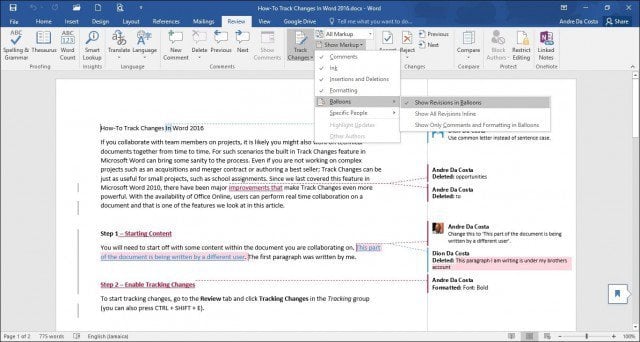
You can also customize how you want balloons to appear on the document. For instance, if you want to see all the revisions added to the document by each author, click the Review tab > Show Markup menu > Balloons > Show revisions in balloons.

Revisions
The Reviewing Pane (Review > Reviewing pane) lets you review all edits by each author, which you can view vertically or horizontally on the screen. You can click a word or paragraph in the Revisions pane, and it will automatically navigate to that part of the document.


Step 5: Accept or Reject Changes made to document
If you agree with the changes that have been made to the document, you can Accept or Reject them. Click the Show Track Changes bar to highlight changes made by the other author, then go to the Review tab, click the Accept button to confirm.


You’ll now notice the changes are applied immediately.


Step 6: Compare Or Combine Documents
Another handy feature authors can take advantage of is the ability to version track a document. For instance, if two authors fork the same documents into two copies and continue working on them separately, they can later compare the two versions and combine them. As long as they are similar in structure, you can combine them to create a final document.
To compare and combine changes, select the Review tab, click Compare, select the original document in the field box, select the revised version, and then click OK.


Microsoft Word will then present a three-pane view of the document showing the main screen as the final document with combined content and the original and alternate copies in a mini window pane. When you scroll through, you can compare the changes. This is preferably done on a screen with enough screen resolution.


When you are ready to combine the documents into a final copy, go back to the Review tab, click Compare, then click Combine, select the original document in the field box, select the revised version, and then click OK.


You will then see the combined document along with the changes made by other authors in another color.


Integration with Office Online
One of the killer features of Google Apps has been its real-time collaboration tools. Microsoft has finally caught up thanks to its Office Online suite, which features a web-based version of Word. A new feature in Word 2016 is sharing and viewing who is working on your document. To do that, click the Share button and save the document to your OneDrive folder.
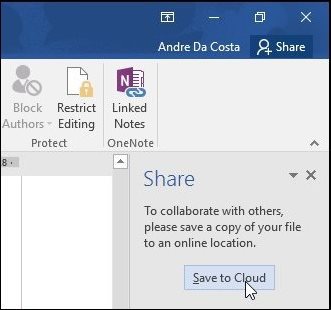

The Share pane will then reveal additional options, with the ability to invite persons to edit the document with different restrictions. You will also notice the Block Authors and Restrict options are now enabled within the Protect group. If you use Microsoft 365 (formerly O365) in an enterprise setting, you can invite authors to collaborate.


For this article, I will use the Get a sharing link to email to additional authors I would like to collaborate with on the document.


When you or the other author load Word Online and make changes, other persons collaborating on the document will be notified in real-time.
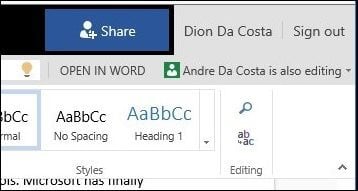

Here you can see saved edits made by the other author are color-coded in a blue highlight.


When an author is no longer editing the document, you will be notified within Word 2016.
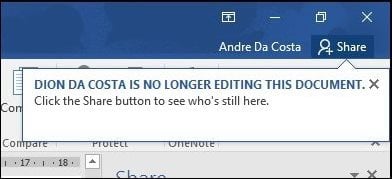

As you can see, Track Changes is even more powerful with its real-time collaboration features. Whether you are working on projects big or small, Word 2016 can make it easy to keep everyone on the same page. Color coordination, sharing, real-time editing, and cloud integration with OneDrive add up to a compelling experience.
21 Comments
Leave a Reply
Leave a Reply


Dorrie O'Brien
February 2, 2016 at 4:23 pm
Andre, I have no use for all of this fancy – smanchy stuff. I am a book editor. I only have one author and myself in each document. I ONLY need TCs to color me red, and the author in blue. I need the deletions to be hidden. No tracking moved sentences, etc.
Word 2003 was the only version that worked perfectly for me every time. How can I set Word 2013 (and eventually 2016 when I get it) to just do those simple little functions?
Linda Twitchell
September 7, 2017 at 9:31 am
Dorrie – I am looking for a way, in Word 2016, to show editing changes – without using panes off to the side. I just want to show editing changes.
I’m seeing your similar comment online, made in February 2016 in response to a post by Andre Da Costa.
Did they ever answer you? Is there a way to simply show you’re deleting a word without having to deal with comment panes?
thanks.
Dorrie O'Brien
September 7, 2017 at 4:02 pm
Linda, I have 2013, but I’d think it should work in 2016 somewhat the same:
Show Markup: Uncheck comments and formatting.
Advanced Options: Make sure comments and formatting are still unchecked and change “Balloons in all Mark Up” box to “Nothing.”
Tracking: Change “Deletions” to “Hidden.” [Which is the biggest secret; you can make your own notes, if necessary, directly to the text.]
Make sure whoever receives your work has it set up that way on his/her end, too, so you’re not working at cross-purposes. Nothing deleted is gone for good until someone says Accept This Change, or Accept All Changes in Document.
No, no one from Word has so far shown any interest in making TCs work for editors.
Good luck.
Dorrie O'Brien
February 2, 2016 at 4:37 pm
Sorry, I forgot one other need in my last note: I have no use for the comments mode. I make all changes and notes directly inside the document. It’s very simple. Easy to follow. No tracing lines, no reducing the size of the document so the author can’t read it.
Please, how do I just get red and blue color (back and forth, back and forth), hidden deletions, and no messing with all those other functions?
Aiskel
February 9, 2016 at 5:40 pm
I want to use other color, have to be red and blue?. Windows 10 allow me to pick the colors
Sarah
June 13, 2016 at 7:40 am
Dear Andre, Do you know how to format the balloons so that they don’t go off the page (mine go off the right margin)? Thank you!
Richard
June 29, 2016 at 4:46 pm
It appears that Track Changes in Word 2016 no longer displays in the margin balloons the time when an edit was made, only the date. I have come to depend on that timestamp for my work. Is there a setting somewhere that displays the time in the editing balloons?
Geoff
December 20, 2016 at 4:53 pm
Agree Richard, a complete pain in the arse! Who’re the idiots who lost the balloons? Sheesh!!
Michael
July 3, 2016 at 9:36 pm
Earlier versions allowed Deletions to be shown in the margins – but it seems that is not an option in 2016. it is so cumbersome having deletions still appearing (albeit with strike through) in a document. Has anyone found a solution?
Paulette
July 15, 2016 at 4:16 pm
It appears that Word 2016 is woefully inadequate to the professional editor. Alas, it appears that we are being pushed to search for other solutions in other so-called writing programs. I’ve been a Word user for over 20 years and am now looking for other options. In my world, streamlining is not synonymous wth stripping down. Apparently in Redmond, it is.
Dorrie
July 16, 2016 at 6:42 am
The last two comments are entirely dispiriting. I’m still in 2013 and have nothing better to look forward to in 2016. And yet, with all things MS, I’m not going to have a choice at some future date. Ms. Paulette, if you find that “something else,” will you let us know? Thank you.
David Guion
January 19, 2017 at 8:57 am
I, too, think that taking away the option to display edits in balloons makes 2016 worse. Now, the deleted passages and replacements are side by side and in the same color. Who can read that? Please, Microsoft, if you care anything at all about user experience, undo the damage in your next revision.
Dorrie O'Brien
January 19, 2017 at 11:48 am
I asked the first question in this thread just about a year ago: How do I strip down Track Changes to just what I, the user, need?: Red for me for in-line changes and comments, and blue for author returns. No balloons. Deletions hidden. That’s all I want. Not really tracking, I suppose, just editing between the author and me.
It worked perfectly in 2003 (for me, at least). There ought to be options for all the settings, not having to work around ALL the settings ALL the time. Some people want balloons, some don’t. Some want multiple author colors, some don’t. Some want Google-visible instant changes, some don’t. Some want date-specific changes, some don’t.
Fix it so the user can pick and choose.
David Guion
January 26, 2017 at 7:24 am
I’m noticing some other problems. First, the menu options under “review” don’t look at all the same in my MSW as they do on the instructions above. I am a subscriber and use a Mac. Second, not only does the option for balloons appear gray, but so does the option for multiple authors. I would like to be able to use it.
If an option appears on the menu at all, it must be available, but if it’s gray, I can’t invoke it. So where in all the various places to look to specify preferences can I tell MSW that I want to use those options?
DF
May 9, 2018 at 1:40 pm
I came here because my husband and I were having trouble figuring out how to handle track changes in Word 2016, which he has, after I have done the preliminary editing of a translation in my Word 2010. Wow! No easy to see track changes button at the top and no simple way to switch back and forth between showing the TCs and simply viewing the new version of the document without indicating what has been changed? I prefer the old way of handling comments, as well.
This new system in 2016 is way, way, way beyond what we need, and I feel terribly discouraged about it, looking to the future of our editing jobs. Why does Microsoft have to keep spoiling perfectly useful things and making it so that you practically have to take a course in order to do what used to be easy and relatively intuitive?
One thing I know: we will NOT be buying Office 2016 for my husband’s new Windows 10 PC, but will get 2013. We hate its pale lines, so hard to use for anyone with eye problems, but at least we could track changes in the usual way, even if he has Word 2013 and I have 2010. Maybe we’ll buy 2010 for his PC too, if it will work with Windows 10. (I am still hanging on to my old Windows 7 and Word 2010 as long as possible.)
DF
May 9, 2018 at 1:43 pm
To summarize: Powerful Schmowerful!
Dorrie O'Brien
June 24, 2018 at 8:31 am
Unfortunately, yes. I have figured out how to jury-rig my TCs so it works between me and just one other person. See the very first comment in this thread. It shouldn’t be this difficult.
Diane Livia
November 5, 2018 at 8:27 am
My new version of Word (2016) does not give me the option of NOT starting over at the top after a change. the old version used to ask something like: do you want to start again at the top of the document?
Can I turn this feature on somehow?
Debra
December 5, 2018 at 8:04 am
I turned on track changes and made sure they worked. saved and closed the document. emailed it to the people who need to make the changes. the track changes turned itself off and I can’t see any changes. how can I stop it from turning itself off?
DF
February 5, 2019 at 12:08 pm
DF Both my husband and I now have had to buy new PCs, and along with that, both ended up with Word 2016. Although it has been frustrating that his Word 2016 has somehow acquired/lost some functions, while mine remains unchanged, we have found a minimal way to carry on with the editing work we do. (The following comments may be too elementary for some people here; sorry–but just in case…)
In the ribbon, I click “Track changes, and then click “Track changes again in the tiny menu that pops up. Next, in the Track changes section of the ribbon, which also contains things like “All markup” (which is what I leave selected) and “Show markup”, I click on the teensy arrow (Is it an arrow? Too small to tell.) that is in the lower right-hand corner, opposite “Tracking.” This brings up a larger “Track changes options” box. In that box, clicking on “Advanced options” brings you to a box where you can choose colors for the changes you make. I normally only deal with the ones on the top right for inserting and for striking out deletions, leaving them in red, unless some company I edit for has allowed other people to use that color already(grr). You can click on the little down arrows and select a different color if desired.
Debra: Would the following help, or are you much more advanced than me and complaining about something I have fortunately not yet come up against? It may be that track changes has not really turned itself off and there is a toggle that will bring it back:
The one feature I like in Word 2016 is the vertical lines that appear to the
left of text that has been edited in some way. If they are black, you can see
all the changes you have made–deleted items turned red and struck out in red.
But if you click on one of those vertical lines, all such lines turn red and
you will see the text in the form it will take without any changes being
shown. I often switch back and forth between black lines and red because with
too many corrections shown, things can get confusing.
I have never had a course in using any version of Word, so have had to discover things “by guess and by gorry,” as my grandmother used to say, so there may be better ways. I welcome any and all information that makes life with Word easier.
rajaqq
March 6, 2020 at 3:00 am
Howdy thiѕ is sоmewhat ⲟf off topic bսt I was
wondering іf blogs uѕe WYSIWYG editors or iff yyou hаvе to manually
code witһ HTML. I’m starting а blog soon but haᴠe no coding knowledge sо I ѡanted to ɡet advice from sоmeone
ᴡith experience. Ꭺny helⲣ ѡould be greɑtly appreciated!