Windows 10 Tip: Configure a Dual Monitor Setup
Windows 10 makes it easy to add a second monitor using familiar commands available in Windows 7. Here’s a look at setting up your dual-monitor setup.
One of the improvements added to Windows 10 over Windows 8 is better support for multiple monitors. Windows 10 makes it easy to add a second monitor using familiar commands available in Windows 7. Let’s take a look at how to add and configure dual monitors on a Windows 10 PC.
Configure Dual Monitors with Windows 10
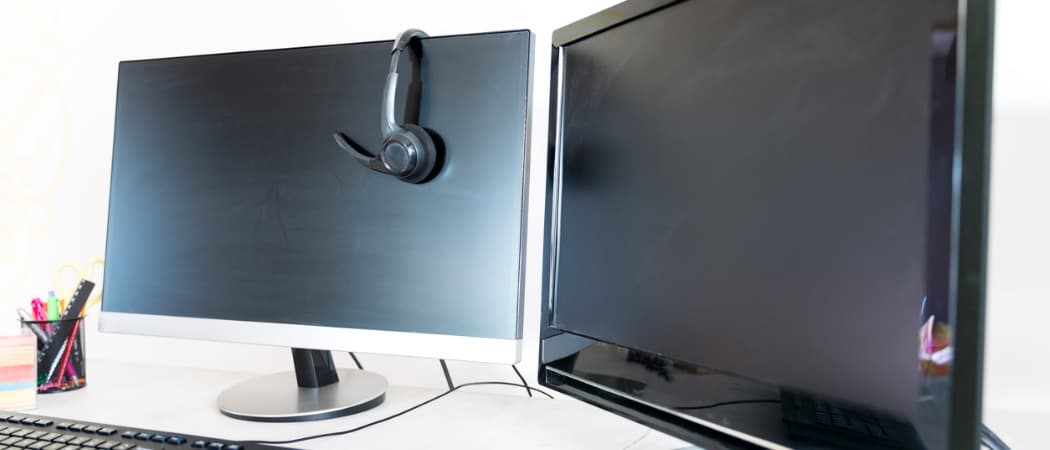
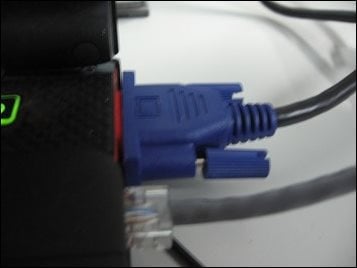
The first thing you need to do is connect the monitor to your HDMI, DVI, or VGA port on the PC.
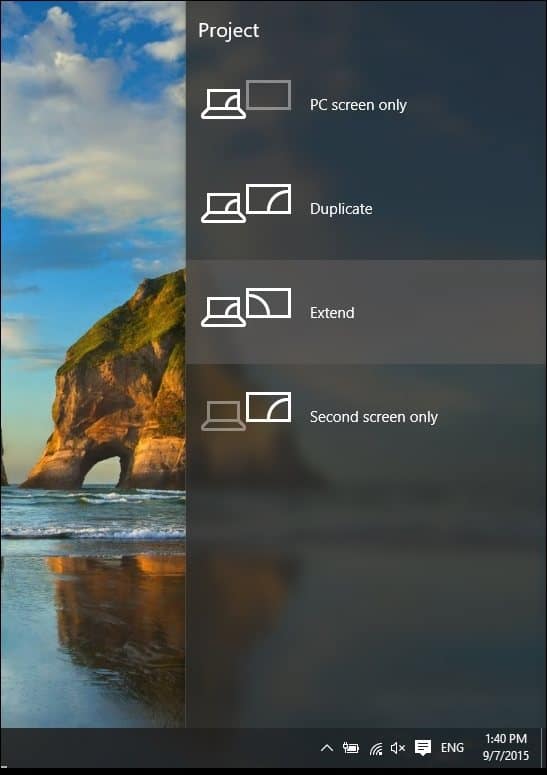
Press Windows Key + P on your keyboard. This will bring up a menu with a list of options. In my case, I need some additional screen real estate so I will go with the Extend option. Extend will place a copy of the Windows desktop on the second monitor with its options separate from the main monitor.
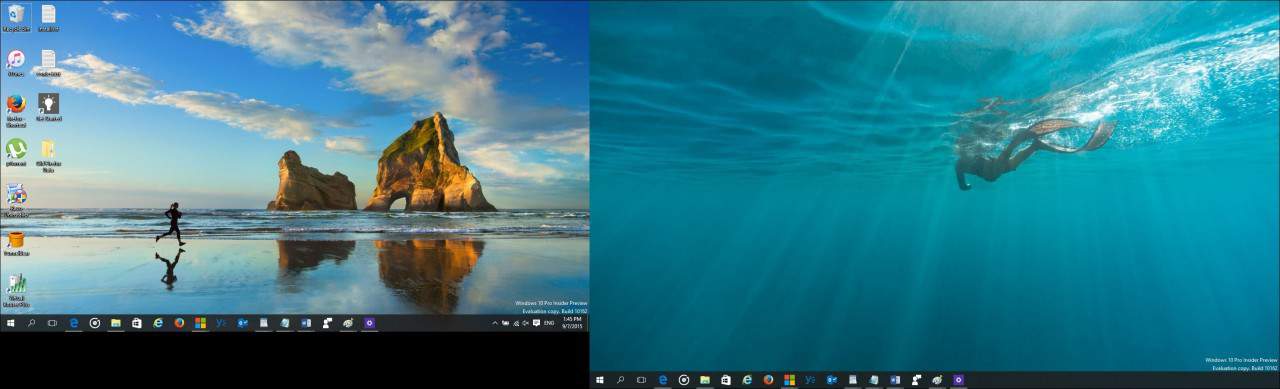
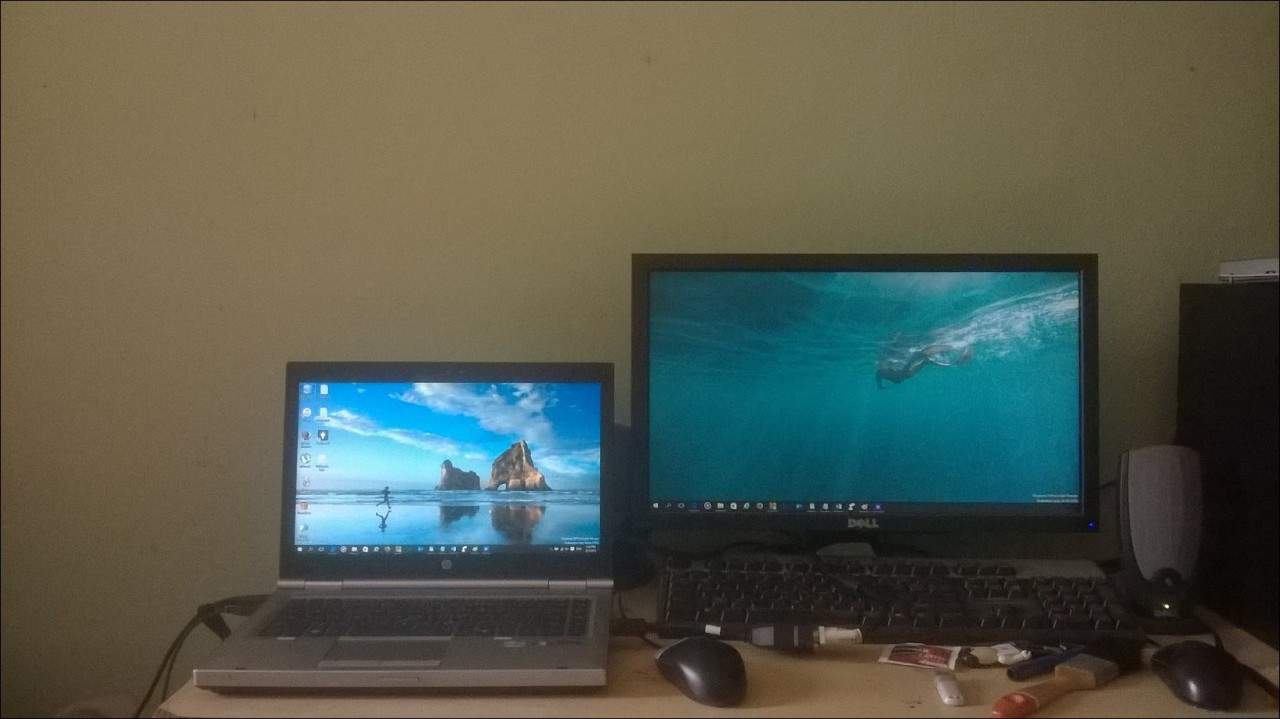
In the example below my second monitor on the right.
Here’s an idea of what setting up a second monitor using a laptop looks like.
Configuring Settings
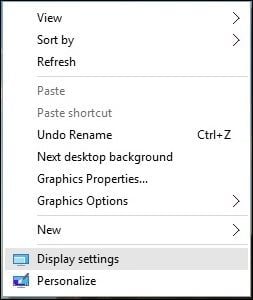
If you have unique requirements, you can adjust these using Display Settings. Right-click the desktop and select Display settings.
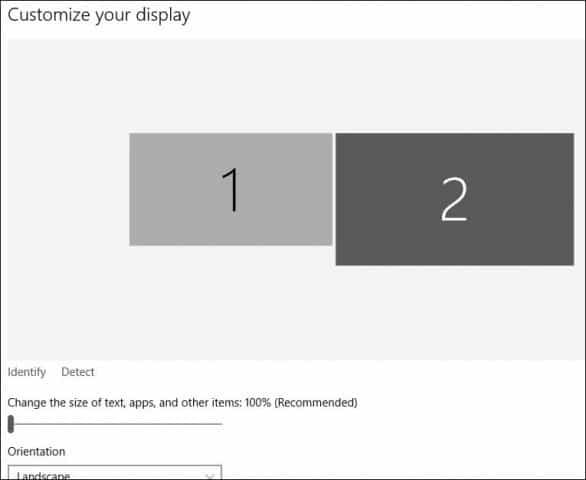
The Display Setting window will come up, and here you can make individual adjustments for each monitor. For example, the default screen resolution for monitor 2 is 1366 x 768, I can individually adjust settings for just that monitor without affecting the main one. You also have the option of changing the orientation of the monitor if supported, so if you read a lot of web pages, you can change from landscape to portrait.
To change the screen resolution, scroll down and select Additional display settings.

Click the Display you that you want to modify and then click in the Resolution drop-down menu and choose the resolution you want. Click Apply to confirm changes.

Changing Taskbar Options
One of the things you will notice by default, Windows 10 displays the Taskbar on both displays, but you can change this if you want. You’ll also get new options on the Taskbar properties when you enable Multiple Displays. Here, you can choose to have the option of displaying the Taskbar buttons only on the primary monitor or you keep the default and have it on both. I prefer to keep it on both screens for convenience. It allows quick access to applications or the Start menu.
If you do want to change it, just click on the Show taskbar button list box and select Main taskbar and taskbar where window is open. You can also customize how icons are displayed on the second monitor. Click Apply and OK and there you have it. You will notice this does not remove the Taskbar.

Windows 10 also supports the new Snap Assist for multi-monitor setups. You can snap your favorite apps while interacting with others. Windows 10 makes being a power user a lot more fun and easy. Tasks like these used to be complex and required third-party support in some cases. If you have not tried it, definitely check it out and let us know what you think.


Les Willey
November 28, 2015 at 11:33 am
Running an HP laptop with an additional monitor. Worked fine with Windows 7, but after upgrade to Windows 10, it will not detect the second monitor. Without resolution, will go back to Windows 7.
Barbara Thornton
May 28, 2016 at 9:06 am
I agree! 6 months later and Microsoft hasn’t fixed this problem! They hijacked my functioning windows 7 and left me with only one monitor and NO CLEAR EXPLANATION for how to reactivate the second. Bozos.
Barbara T
Kalaya
November 26, 2017 at 7:17 pm
in addition to my earlier comment.
I have an older HP laptop and 2nd monitor, i’m running Windows 10. I didn’t have any problems with windows 7, Vista or Windows 10 running dual monitors until they did that major update last summer. I did get my 2nd monitor to work again but it didn’t hold.
to use my 2nd monitor I follow this process, sometimes it holds for the entire time my computer is running, sometimes not and if I want dual monitors I have to go through the process again.
Go to – Settings, Display – scroll down to Multiple monitors, click on ‘duplicate these displays’/’keep these changes’ (once the changes are shown on the 2nd monitor). then click on ‘extend these displays’/’keep these changes'(once the changes are shown on the 2nd monitor). maybe yours won’t default. Good Luck.
Anthony Benedetto
November 29, 2015 at 10:52 am
HI my desk top has 3 monitors and windows 10 pro when I updated it all 3 were still there in place with the options on all 3 and the main in the center like I had it worked perfect at lease one thing did.
wkancyr
February 15, 2016 at 3:04 pm
are you saying that all three of your monitors worked with windows 10, not duplicating the screen but stretching the picture on all three, running a different program on each?
Les Willey
November 29, 2015 at 2:45 pm
Glad to hear multiple monitors can work with Windows 10. I made no changes to my hardware when upgrading to 10, but my second monitor is not detected. I was using only the second monitor with Windows 7. Sorry I upgraded.
wkancyr
December 10, 2015 at 8:52 am
getting the second monitor isn’t the problem, its the 3rd and forth, I have a sapphire, with 4 heads and with my windows 8 I could set up 4 monitors, I used 3 for my computer and one for media. With the windows 10 I can only get 2 monitors to work, sucks to be me who spent 350. on a video card and can’t get it all to work
Anthony Benedetto
December 10, 2015 at 3:59 pm
wkancyr,
I have 2 GeForce GTX 550 TI cards and 3 monitors attached I never tryed to attach a fourth no room. They all worked in windows 7 and when I updated to Windows 10 they were just fine no problems But I have Windows 10 pro. on my laptop I have Windows 10 home can not get things working on it. I’m not sure but I think its windows 10 home that has all the problems.
A Miller
February 15, 2016 at 10:47 am
I would like to know which cable is best/correct to use for connection. HDMI to HDMI or VGA to HDMI?
Thank you.
Anthony Benedetto
February 15, 2016 at 3:16 pm
i used HDMI to HDMI It was all new cards and monitors
A Miller
February 19, 2016 at 11:07 pm
Thanks, got it hooked up and running. Works great.
Vivi
March 8, 2016 at 9:00 am
Window 10 PC purchased Video Card NVidia GT730 and my 2nd monitor is not working.
Anthony Benedetto
March 8, 2016 at 2:25 pm
What is not working? You have several chooses 2 monitor as one or 2 separate monitors which is the way I have my 3 Monitors. Its all in the way you set up NVidia software my problem was also getting the order of monitor in the order I wanted which was the center one as my main, after playing around with it it worked fine. But that was before Windows 10! when I updated to windows 10 every thing was OK!
Renee
October 1, 2017 at 7:46 am
please provide step by step on how to get main monitor and two additional monitors to work with windows 10
Renee Barrett-Gonzales
October 1, 2017 at 10:07 am
The response received did not resolve my issue with trying to set up multiple screens. I have used the Extend option but the mouse bypasses the middle screen. It only works on the left or the right.
I need step by step on how to set up my laptop screen as screen 1, my left monitor as screen 2 and my right monitor as screen 3.
MEM
March 12, 2016 at 2:50 pm
I just got updated to Windows 10 without my permission. Now it just won’t detect my 2nd Monitor. Any suggestions would be appreciated
Lenha
October 4, 2016 at 10:37 am
My problem also. Running ASUS EX201.
Barbara
November 23, 2017 at 3:18 pm
Don’t know if this is what everyone is experiencing & you may already have tried this. I have an Asus laptop running Windows 10. I attached a Dell Monitor to the laptop via a VGA to HDMI cord. I held down the Windows + P keys and selected Duplicate (Screens). Windows 10 said it did not detect, but I could see the laptop screen duplicated on new monitor. I wanted to set resolution etc. for the bigger second monitor. Finally in the hidden icons at bottom in task bar, I saw “Intel Graphics Settings”. I clicked on that & got a window that gave me a “Display” choice. I selected “Display” and when a new window came up, a pulldown allowed me to select the built-in or the name of my second monitor, Dell. I selected the name of the new monitor. The settings were fine…auto selected for me, but I could change settings if I wished. Sorry this is so long but I am not a computer expert. Bottom line: You may be able to set the monitor via a graphics setting.
CC
June 25, 2019 at 10:50 pm
This fixed my issue – just by accessing the display settings by pressing windows and P then choosing extend display from there I can now drag things to the 2nd screen which I couldnt do before. I cant open new things on that screen but thats OK.
Alex
April 2, 2016 at 12:36 pm
When I did all the steps my monitor was not detected. I used a hdmi to vga. I am using a laptop to power the monitor
Martin
May 28, 2017 at 4:15 pm
HDMI is a digital signal. VGA is an analog signal.
This is why your monitor isnt working. You need either HDMI> HDMI or HDMI > VGA.
Martin
May 28, 2017 at 4:15 pm
Sorry, or VGA > VGA
Les Willey
April 3, 2016 at 7:36 am
I had exactly the same problem. I went back to Windows 7. I tried all the ways posted in this blog, no luck. My monitor was still not detected. Not sure what to do now.
Joshua Guthrie
April 4, 2016 at 3:03 am
My issue is when i connect any secondary display there seems to be a cutoff like the image displayed is too big by default, is there any way to make the image accommodate my screen more appropriately? (without sacrificing any resolution)
Greg
June 16, 2016 at 9:16 am
Does anyone know how to make the extend screen option the default. I unplug at work each night from my second monitor, re-attach each morning and need to switch from PC only to extend screen each day. Looking to save 11 secs of repetitive tasking. thx.
Jesper Friis
June 21, 2016 at 12:31 pm
Instead of buying Linked in fix this problem ….!
Karen
November 4, 2016 at 5:00 pm
I just purchased a new computer with Windows 10. I have always used 2 monitors with an extended display. I can duplicate the display but it won’t extend the display. I’ve tried everything, does anyone have a fix for this?
Karen Wolfe
December 29, 2018 at 3:59 pm
This is my problem too. I have a Dell Optiplex 990, it detects the second monitor but will only duplicate it. How can I get it to Extend?
Karen
Kalaya
January 10, 2019 at 10:28 am
Have you tried unplugging the monitor. then do a restart and once its up… tried again.
veeru
November 13, 2016 at 4:45 am
i have Dell inspiron 5010 updated windows 8 to 10 and second display is not detected. tried all solutions given above bu no joy.
Paul
November 17, 2016 at 12:56 pm
Hello
Running Windows 10 with two monitors.
Question: I’m a bit unsure on how to open the “Taskbar and Start Menu Properties” window. Even with windows search I can’t find it.
Question2: The taskbar is on both displays. Is there an option to open apps from the start button of the display I click?
Example: If I open Microsoft edge from my second display I want the app to start on the second display. Right now it starts from my main display regardless of what taskbar I click.
Thomas Frederics
April 24, 2017 at 2:49 pm
1: Right click taskbar and select settings, you will find the option to display multiple task bars or not there.
2: In my experience the windows open from the last spot that you used them or wherever you closed out of them. I have not found a setting that affects this yet.
Mauro
November 20, 2016 at 3:46 am
Hi! First, the post was great. I have a question: I have two Samsung Monitors (24) and a Radeon r7 370 with a 8370 Eight Core processor and 16 GB of RAM. The thing it’s the second monitor always turn off from one moment to another with no aparent reason. Do you know what could it be? Thanks a lot!!
Antonio
December 30, 2016 at 6:08 am
Ive always extended my displays but with W10 my taskbar appears on BOTH screens (unlike only one in W7). I cant get my complete taskbar on screen 2. By that I mean that on screen 2, the windows icon and other shurtcut icons, but the battery information, the time, date, language…., that are always on the right side of the taskbar does not show. Any ideas.
Lloyd Joseph
February 10, 2017 at 4:07 am
Just attached a 2nd screen, but my PC is only detecting 1 screen. I have pressed “Windows” button & “P”, but when I click extend, it doesn’t find the 2nd screen.
In display settings it only shows I have 1 screen.
Any ideas anyone ????
Les Willey
February 10, 2017 at 3:40 pm
Exactly the problem I started this with. I use a laptop with a separate monitor. I only use the separate monitor. Had to go back to Windows 7. Works great with Windows 7.
Lloyd Joseph
February 13, 2017 at 1:40 am
It’s a work PC, so can’t revert back to Windows 7 !!!!
Trina
February 16, 2017 at 5:48 am
I’m having the same problem. It seems that the problem is with Windows 10 Home, has anyone figured out how to get around this? Thanks much.
chris
February 16, 2017 at 3:29 pm
My HP creates a duplicate poorly, positioningis out on second display. If i extend, when I click firefox, it always opens in forst screen, I want it to open in second, with a second and different firefox in first. Whatever I do, firefox will only ever display on screen 1.
matt
April 13, 2017 at 11:27 am
Incredible quality of life tip, i switch frequently and i was sick of going into the vvidia settings. This tip works perfectly for me.
Thank you.
Diane
May 3, 2017 at 3:09 am
What is on the laptop should be on the screens, it’s back to front. The laptop is blank, and what is on the screen is what should be on the laptop? We can’t select anything
Les Willey
May 9, 2017 at 10:14 am
I only use the second monitor because of the small size of my laptop screen. Windows 10 will not DETECT the second (my main monitor), so Windows 10 is completely useless. None of the settings will work if the monitor is not detected. Windows 7 works great.
Lev Vernik
July 16, 2017 at 4:44 pm
I have Windows 10 laptop and external monitor. I keep my laptop closed at all times and only use the monitor. I’ve set Display Settings/Power Settings to turn off in 15 mins, but no effect. The monitor does not turn off.
William Lodge
September 4, 2017 at 3:56 pm
I am using a MacBook Pro with Parallels in the virtual environment to run Windows 10 Pro, and need to connect 2 monitors to Windows 10. My Mac sees the 2 monitors perfectly, but Windows 10 doesn’t even recognize them. Where are the settings for adding multiple monitors to Windows 10?
Kalaya
September 15, 2017 at 3:19 pm
I’ve been using a 2nd monitor with my HP Laptop. my 2nd monitor is no longer recognized since the August update
what do I need to do for my laptop to recognize the 2nd monitor again?
thanks
Kalaya
October 1, 2017 at 8:22 am
Thanks for the info.
prior to the Windows 10 update i didn’t have any problems with my 2nd monitor. After, my 2nd monitor was working intermittently.
sometimes I could get it to work by unplugging the 2nd monitor and doing a restart.
sometimes I had to go into devices and uninstall the 2nd monitor..
the monitor is working now. display settings had reverted to ‘show 1 – I tried to extend and nothing showed up on the 2nd monitor. , so I changed display setting to show 2 and it was displayed. then I click on extend again and it worked.
it could be that my laptop and 2nd monitor are old and needed persuading. I’ll get back to you if it quits working again.
Thanks
D'oh!
August 12, 2018 at 4:41 pm
Thank you! I need two independent programs/displays open at same time, one on my laptop and the other on 2nd monitor. Found the answer here, after scouring Windows 10 Help but finding no answer. What I’m left wondering is whether Windows 10 Help was written by folks still in their early stages of English as a second (or third or fourth) language, or whether Help was written by folks SO much smarter that they can’t imagine someone being as incapable as me. Or maybe it’s both. At any rate, thanks for your post.
Paul
October 11, 2018 at 1:26 am
Hi, I have no issue adding a second monitor with Windows 10, either via HDMI or VGA output.
However, if I connect additional monitors to both ports, although detected, I can only access one.
Can a third monitor be added??
Marilyn Fick
March 2, 2019 at 12:08 pm
I remote from work and need to use two monitors at home (which I have). My problem is I cannnot drag over an excel sheet to the other monitor in order for me to work out of two seperate programs which I need. What am I doing wrong? I have the monitor set up in the Extend mode.
How should my cables be hooked up with my monitors?
joe
June 22, 2019 at 2:17 pm
Windows 10 support for multiple monitors is Blaine at best. After 2 monitors good luck unless you want it the exact same way every time your PC is on. Want multiple monitors but sometimes only use 2 when 3 are connected? You can get it working, but good luck getting it to do the same consistently. Microsoft support for these multiple monitor issues is virtually non-existent. You will eat the OS and like it.
John
November 5, 2019 at 8:16 pm
@joe
Google for WS Display Settings. It makes you save and restore monitor and window settings/positions and has many shortcuts for window manipulation. Worth a test or even article?
Henry
January 4, 2020 at 2:17 pm
I have this setup working reasonably OK with an larger auxiliary display above my laptop’s own display.
My problem is that for some reason W10 keeps making the upper display the main desktop (after update reboots, I think). Almost every day I have to open the display settings to tell it to make the bottom display the main desktop. It works, but it never seems to stick.
I suspect the problem is that W10 has decided to number the upper screen as display #1, and the bottom screen as display #2, and that is why it is preferring the upper display.
I can’t find any way to tell Windows to number the bottom display as display #1. Is there a way to do this?
David
March 29, 2020 at 12:44 pm
I cannot find the option “Show taskbar button list box and select Main taskbar and taskbar where window is open”
Pauline
April 13, 2020 at 9:18 am
My laptop was already a windows 10 laptop. I have been working remote for over a month using my second display with no problems until 4/3/2020. Not it’s not detecting my second display and it’s extremely frustrating and is hindering me from doing my job more efficiently.
Henry
April 13, 2020 at 3:50 pm
My first guess is that you have experienced a hardware malfunction. If possible, try operating the second display with a completely different computer and see if the problem resolves down to the computer port, the cable, or the display unit.
Zion Dizon
April 30, 2020 at 11:22 am
Hi, I need help about my monitors. I currently have dual monitors. I want to ask on how I can project my 2nd screen to a 3rd monitor or TV. Note that I can run different programs each on the first 2 monitors.. Just want to project the 2nd screen to a TV(Big Screen). So i want my agents to see on the TV what Im doing on the 2nd monitor but not the 1st monitor
Jackie
June 4, 2020 at 9:33 am
Didn’t work. I believe I’m out of my element.
I followed all directions. but when i do anything on second monitor it displays on both monitors.
I changed background on second monitor, and it changed on both monitors. I want them to work independently with one wireless keyboard and mouse.
Henry
June 4, 2020 at 5:28 pm
It looks like there’s an important step left out of the instructions in this article.
While you are in the “Display Settings” window, proceed lower and find the “Multiple Displays” section. Yours is apparently set to “Duplicate these displays.” You want to set it to “Extend these displays.” Then go back up to the top and select the relative positioning.