How to Insert Excel Data into PowerPoint

There are a few ways to insert Microsoft Excel data into a PowerPoint presentation. Here’s what to do.
All Microsoft Office software allows you to combine content from other Office apps. If, for example, you have a data-heavy PowerPoint presentation, you might want to support it with further data from Microsoft Excel.
This is entirely possible, and there are a few ways to do it. For example, you can insert an entire Excel spreadsheet, similar to how you might insert PDFs into PowerPoint. You can also paste parts of a spreadsheet into a PowerPoint slide using your clipboard.
Here’s how to insert Excel data into Powerpoint using either method. These instructions should work for all recent versions of Microsoft Office, including Office 365 and Online.
Inserting an Excel Spreadsheet into PowerPoint
Using the Insert Object tool, you can insert data from your Excel spreadsheet as an object. For example, this will add the most recently accessed worksheet contents into PowerPoint for you to view.
You’ll need to make sure that the worksheet you want to use is visible and active when you next save your Excel spreadsheet.
To start, open your PowerPoint presentation and press the Insert tab on the ribbon bar.


To insert your Excel data, click the Object button. This may appear as a large or small icon, depending on your current screen resolution and the size of the PowerPoint window.


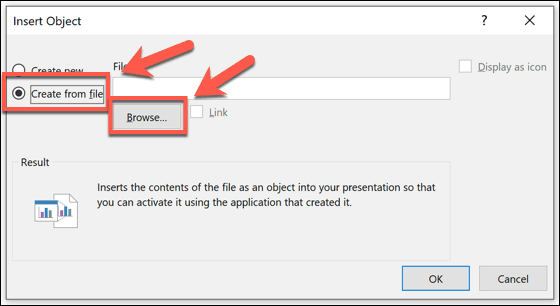
This will load the Insert Object options box. To add your Excel data, press the Create from file radio button, then press Browse to find and select your Excel spreadsheet.


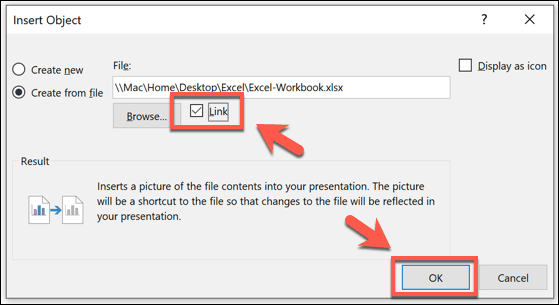
If you choose the Link option, your data will continually update. Any changes you make in Excel will be reflected in PowerPoint when you next save your Excel file.
To add your data to PowerPoint, press the OK button.


The data will be inserted as an object onto your PowerPoint slide, which you can then resize and manipulate.


Double-clicking the object will load the file in Excel, allowing you to make further changes, where necessary.
Copying Excel Data into PowerPoint
The powerful copy and paste tools that Microsoft offers in its Office suite allow you to copy and paste Excel data into PowerPoint directly. This data can be formatted in different ways. For example, you can format it into a table, paste it as an image, or remove all formatting and place the data into a text box.
To do this, open your Excel spreadsheet and select the data. Then, to copy the data, press Ctrl + C or press Home > Copy.


Return to your PowerPoint presentation and select the slide where you intend to paste the data.
In the position where you’d like to place the pasted data on your slide, right-click and choose one of the Paste options.


Alternatively, press the Home tab on the ribbon bar, then press the Paste button to view the available options instead.
If you click the Use Destination Styles (1) option, this will paste the data as a table, merging it with the style of your PowerPoint theme. Choosing Keep Source Formatting (2) will also paste it as a table, but it will maintain the formatting from your Excel spreadsheet.


You can also choose the Embed (3) option, which will paste it as an object and allow you to edit the data in Excel later. You can also press Picture (4) to paste the data as an image, which won’t allow you to edit it.


Finally, if you’d prefer to remove any formatting, choose Keep Text Only. This will paste the data into a new text box.


Depending on the option you choose, your Excel data will be pasted into PowerPoint at this point. You can then edit it using the options available to you, depending on which paste method you choose.
Using PowerPoint with Other Office Apps
By inserting Excel data into PowerPoint, you’re using the full range of the Microsoft Office suite to your advantage. You can take things even further by converting a PowerPoint presentation to a Word document, for instance.
You can even think about reducing your PowerPoint file size if it gets too big to share. Let us know your tips for creating better PowerPoint presentations in the comments below.


