How to Add Touch ID Fingerprints to your iPhone or iPad

Adding Multiple Touch ID fingerprints to unlock your iPhone or iPad is easy, convenient, and more secure than just a passcode. Here’s how to do it.
If you have an iPhone 6 running iOS 8 or higher. One of the security features is Touch ID. It allows you to unlock your iPhone or iPad using a fingerprint instead of typing in a passcode. You simply place a finger on the Home button and the device unlocks by scanning your fingerprint. Because you can add more than one finger, it’s super convenient, secure, and easy to set up. Here’s how to configure it on an iPhone or iPad.
Set Up Touch ID for iPhone or iPad
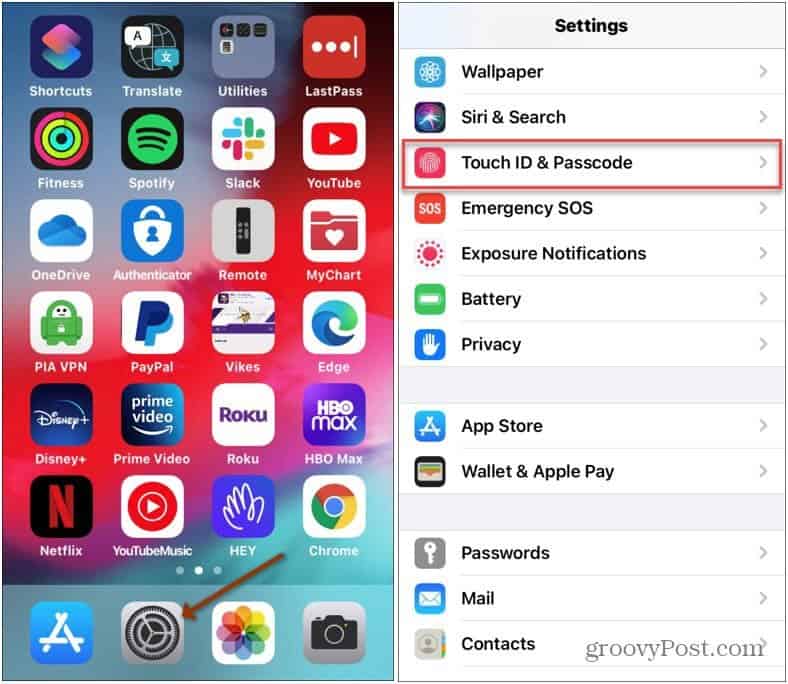
Tap Settings and then scroll down and tap Touch ID & Passcode.


Being that you’re changing the security settings on your device, Apple wants to make sure it’s you. Type in your passcode when prompted.


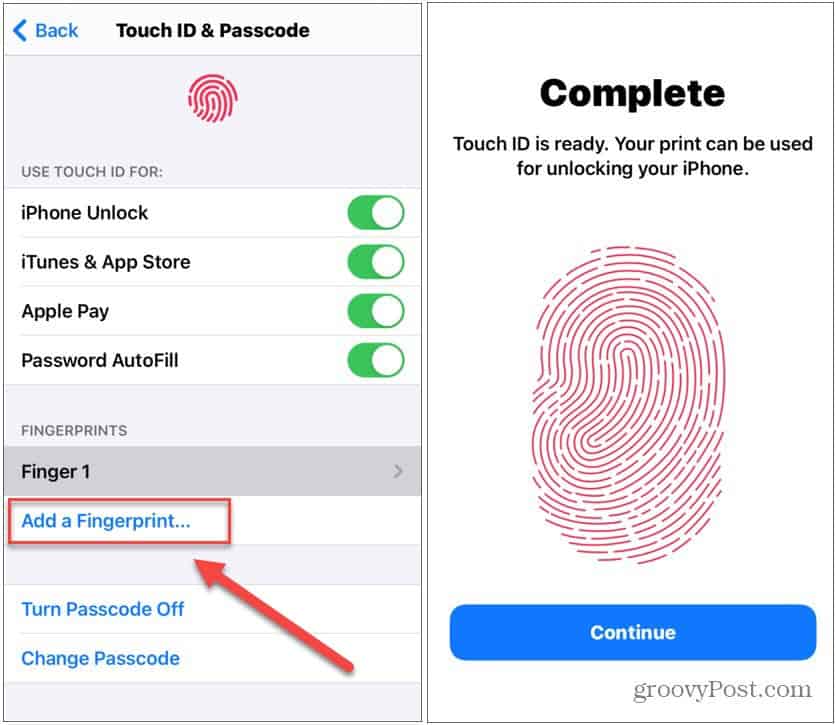
After typing in your passcode tap Add a Fingerprint. Then your phone will prompt you to place your finger on the Home button several times.
Your iPhone or iPad will capture all aspects of your fingerprint. Progress is displayed by filling out a fingerprint on your screen. Follow the prompts until the full scan is complete.
Note: Although the device will prompt you to lift your finger, each time your print is read, your device will vibrate. Lift your finger and place it again when prompted. When it’s complete tap the Continue button.


Note: After using my iPhone for a few days, I found my index finger and my two thumbprints are the handiest to have on file. My wife added one of her fingers as well for easy access to my iPad.
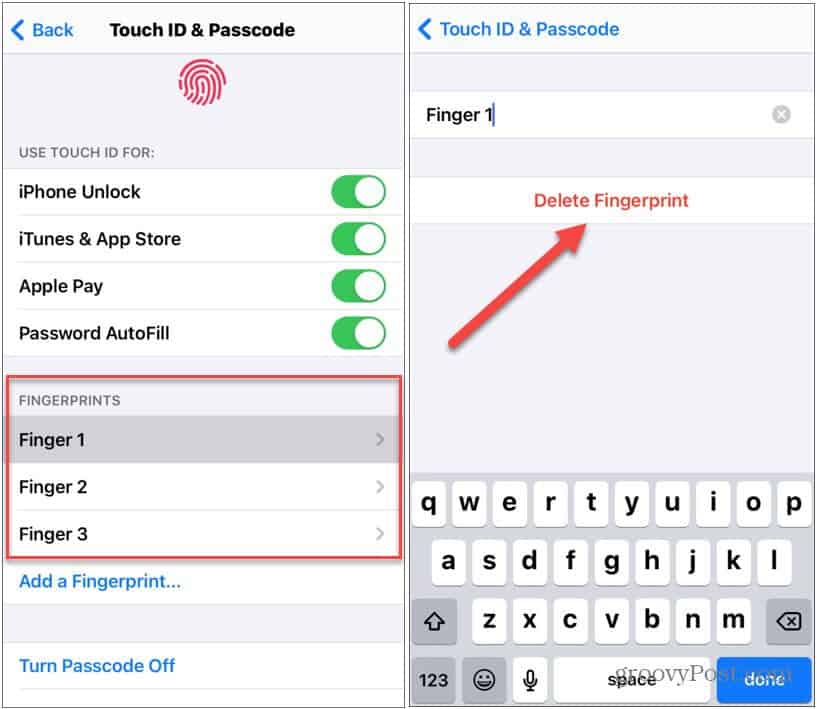
When completed, your new fingerprint will be listed as Finger 1, Finger 2, etc. If you ever want to remove a fingerprint, simply tap the one you want to remove. Then tap the Delete Fingerprint button. It’s also worth noting that you can change the name of your fingerprint from this screen, too.


A nice side benefit of unlocking your iOS device with Touch ID is your kids can no longer spy on you while you’re unlocking it with a passcode. And if you have a newer device, check out our article on how to use Face ID to unlock your iPhone.
6 Comments
Leave a Reply
Leave a Reply


jjkitc
December 27, 2014 at 4:14 am
Why doesn’t my iPad have ‘Touch ID & Passcode’? In ‘Settings’ it only lists ‘Passcode’
Steve Krause
December 27, 2014 at 2:54 pm
Hey there. Thanks for your question. One things I should have put into the article is that Touch ID is only available in the latest versions of the iPad and iPhone. Here’s the list devices that support Touch ID:
* iPhone 5S
* iPhone 6
* iPhone 6 Plus
* iPad Air 2
* iPad Mini 3
* Future iPhones and iPads (obviously)
So if you have a device earlier than the list below, unfortunately your device won’t support it…
-S
Farzwan
February 19, 2015 at 3:59 am
i know how to add upto ten fingers
in the first step of configuring touch id give the fingerprint of 1 finger and in the next step give the print of an other finger which then allows you to open your apple device with both fingers and if you do that in 5 fingerprints you can unlock it with upto 10 fingers
Thanks,
Farzwan Mohamed
Jyoti
March 23, 2015 at 11:22 am
Hi,
I can give all my 5 fingers of one hand in just one fingerprint and can unlock with any of my finger. Shouldn’t it be just one finger per fingerprint?
Thanks
Joyce
September 25, 2015 at 8:24 pm
So I just updated my i Pad with the fingerprint and passcode. However stupidly made a note of the passcode on the i pad, intending to write it down elsewhere also. Now for some reason my i Pad is not accepting my fingerprint, it wants my passcode, which I don’t have. What do I do now, I can’t open my i Pad?
Help
March 13, 2016 at 10:48 am
So I have an iPhone 5s but the Touch ID doesn’t pop up in Settings. I’m not sure why. Anyone??